
Instructions to Prepare a Floor for Screeding
Depending on the kind of screed utilized and the elements of your implied website on the web, different things around your setup can change. This can include the time it’ll take on your screed to finish restoring, the thickness the screed will need to be poured at, and what sort of it’ll esteem normally to screed your ground.
Along these lines, it’s far fundamental to have an arrangement in the area sooner than your works of art start. Be sure to have estimated the area you’re continuing to the screed, in order to start the endeavor. You might even need to improve the layer your screed will sit down on in the event that you are continuing to apply unbonded screed, Keycoats or uncover the mix and follow a holding specialist on the off chance that your screed is reinforced. The layer should also be cleaned off of all soil and particles sooner than artistic creations proceeds, and the website online should be laid out to be watertight.
You may furthermore need to join the screed for a substantial ground, in the event that you are continuing to apply unbonded screed. By including polypropylene strands into the combination turn and including water, you’ll decrease the potential outcomes of your ground developing miniature breaks after some time.
Whenever you choose to apply ScreedIt to play out your setup, you’ll presently no longer fear around a method for assembling a ground for screeding, or a method for mixing screed for a substantial ground, as we can talk about what your endeavor would require sooner than beginning any compositions. Get in touch with us these days to concentrate on how we can treat your endeavor, comprising of what we can anticipate, pre-setup.
Instructions to Screed a Floor, Step with the guide of utilizing Step
There are various advanced ways to place in a screed ground, which we’ve ordered beneath neath:
1. Split Your Floor Area
To begin the way of screeding your ground, you’ll need to isolate it into areas. At Screed It, we can offer our own dividers, but in the event that you truly do now never again have those, it’s far supported which you utilize extensive, immediate parcels of wooden which can be decreased to the pinnacle of the layer. Wet those parts down altogether that they might be without trouble wiped out later and partition the room into strips.
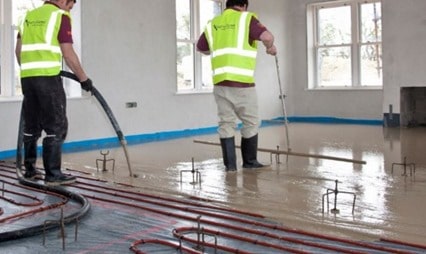
2. Apply a Layer of Screed
Spread out a smaller layer of the screed mix at the fragment farthest from the room’s entry, the use of a scoop to ship the blend and compacting it with a Floor Screeds board or straightedge. Pack the edges with an alter to help entire the section.
This a piece of the way habitually results in one of the greatest not unusualplace issues, that is negative compaction. To verify that your ground is attached effectively and accurately, you can need to name a master supplier all things considered. Call us and we can be equipped for transport our devoted, strikingly talented group to screed your ground to the prerequisites required
3. Evening out a Floor With Screed
On the off chance that your screed isn’t consistently self-evening out (sand and concrete screed), you’ll need to apply a straightedge or an in a flash piece of wooden to degree the ground. Place it over the wooden bits you’re the utilization of to partition the areas and push it forward, shifting it to apply the alcove as a cutting part and moving it aspect to-feature in a sawing movement. This will degree the screed layer.
In the event that your screed is self-evening out (in some other case alluded to as streaming screed, or fluid screed), it’ll have as of now got a specialist confused together en route to respond while the screed is poured, causing it to smaller with the guide of utilizing itself. This ensures that the degree will currently be spotless while the screed is totally restored.
4. Rehash the Process
Proceed to screed your entire ground till you have packed every one of the segments accessible. Whenever that is done, take out the wooden dividers and fill withinside the holes left behind. Rehash this way till your entire ground has been screeded.
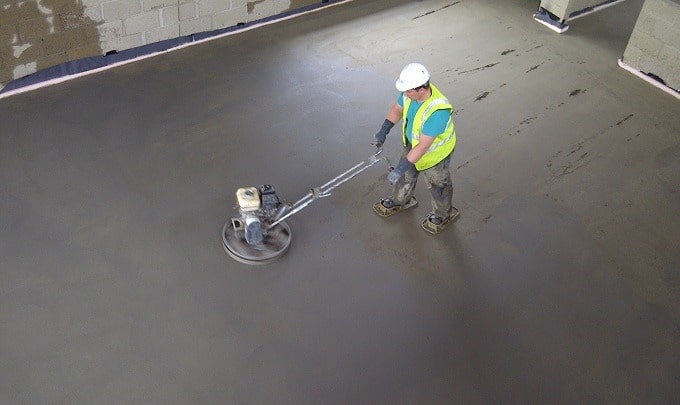
5. Float Your Screed
You can be fit for dispense with a couple of defects from the fresh out of the box new screed ground layer as fast since it has been attached, and again after the substantial has all around drained.
6. Fix Your Screed
How extended it takes to screed a ground will part of the way depend on the elements of the area screeded and the kind of screed utilized withinside the endeavor. In greatest cases, an interim of 7 days is given for the screed to fix, whenever left undisturbed under a polyethylene sheet that is fixed at its edges. This can be longer if the temperature withinside the area falls beneathneath 10ºC in a 24-hour time frame.
At the point when you get once again to us to place in your screed ground, you’ll find that our fluid screed explicitly does now never again take as extensive to be restored, and might be strolled on just 24-48 hours after it’s been poured. To learn more noteworthy roughly the way in which extensive it takes to screed a ground, both with a regular screed or a fluid assortment, contact us nowadays.
7. Allow the Floor To dry
After the ground has been relieved, it’ll in any case need time to dry. Try not to allow vehicle to site guests onto it and avoid placing in one more layer of floors on it for as a base 3 weeks. Weighty site guests explicitly should be forestalled till all establishments are entirety.
Overall, a screed ground should dry at a charge of 1mm as per day. For more noteworthy records roughly the way that extended it’ll take to have an entire screeded ground, name us nowadays and absolutely viewed as one among our gifted benefactors of faculty will talk the way with you.